We hosted a Wipeout themed birthday party for my son's 8th birthday and it was a huge hit! All 26 party guests had SUCH a great time slipping, sliding, and wiping out!
We had a total of 10 obstacles. Each guest completed the whole course a number of times and then went on to spend time on some of their favorite obstacles. This helped to keep everyone entertained for well over 2 hours.
Slippery Slope:
Zig Zag:
Zip Line:
Big Red Balls:
Wrecking Ball:
Sucker Punch:
Sweeper Arm:
Face It:
Drop Zone:
More Party Stuff
Cake:
Party Favors:
 |
| Gumball filled treat bags to resemble the Big Red Balls obstacle |
 |
| "Medals" for finishing the course |
 |
| Neon wayfarer sunglasses, personalized for each guest |
Obstacle Signs:
 |
Laminated signs for each obstacle along the course
***Link to printable coming soon***
|
Snacks:
 |
| Individual popcorn bags |
 |
| Snowcones with flavors for kids to choose from |
Party Prep
Foam Dive - We happen to have a Little Tykes inflatable bounce house already, so I definitely wanted to put it to use. We filled the bounce house with about 7 cans of unscented shaving cream that I purchased from Dollar Tree. We chose to start the course off with this as the kids would climb in the back of the bounce house and go down the slide in order to give them a start down the "Slippery Slope" slip & slide.
Slippery Slope - I created this fun slip & slide using 50 ft of plastic sheeting from Lowe's, foam pool noodles, 2 inflatable rafts from 5 Below, and lots of tear free baby shampoo.
I used the foam pool noodles on the sides of the sheeting to both keep the kids from sliding off the plastic as well as keep the water on. I found instructions for how to easily make a pocket running along the sides on this site. He uses Velcro pieces to attach the sheeting which I did at first too, but I then decided to make things easier and just use duct tape and it worked just as well. So if you want to save a couple bucks, skip buying the Velcro and just follow his instructions using duct tape instead.

I thought it would be best to have a soft landing pad for the kids to end on vs just sliding onto the grass. I immediately thought a water blob would be perfect. As I've done before, I tried to make one, this time using an ironing method to seal the seams vs the usual duct tape. Instead of the seams leaking this time though, they just bust open in spots and my frustration level grew with each hole. The next day I was shopping at 5 Below and had one of those brilliant "Aha!" moments. I purchased 2 inflatable pool rafts and filled them with water using the nozzle hose attachment that I use to fill water balloons. It worked like a charm! These new water blobs are SO much easier, leak free, and WAY more portable than the water blobs you see on Pinterest.
As you can see from the picture, the rafts have partition seams running down them. When I noticed the first section getting too full of water, I just applied pressure with my hand at the bottom to help the water spread into the next section. Be sure to do that periodically to avoid over filling and bursting the seams.
This slip & slide was a HUGE hit among the kids and may have also been enjoyed by my sister-in-law the night before during set up as well.
Zig Zag - I used about 20 or so pool noodles for this and it turned out super fun! They're $1 each pretty much everywhere except for Michaels, where they cost $1.99 for some reason, but watch for them to go on sale and then use a coupon. I ended up paying only about )".60 each for them that way.
The kids loved running through it and getting whacked by all the noodles. The set up is super easy and quick using thin stakes of some sort. I happen to have an abundance of bamboo in my backyard so I decided to use it to my advantage. I just cut the stalks for stakes that were about 8" each. I hammered them into the ground halfway using a rubber mallet with each stake being about 6"- 8" apart. Then I just slid the pool noodles right onto the stakes. It was as simple as that! Super fun obstacle and looked pretty cool too!
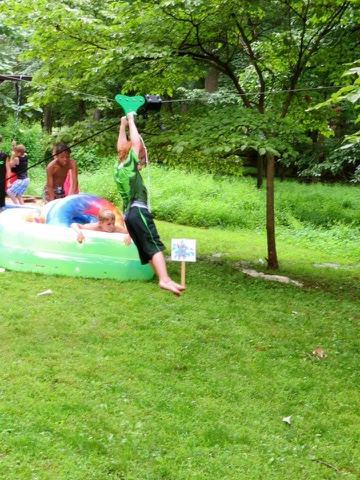
Zip Line - I installed our zip line a few summers ago and it's always so exciting for everyone, so I definitely wanted to incorporate it into our Wipeout course. To switch things up a bit, I just added a bucket of water next to it with some foam water sprayers so that the kids could spray the person zipping down. Extra giggles!
Big Red Balls - For this part of the course, I used a large rectangular inflatable pool, 3 red ball hoppers from 5 Below, and 3 old tires. I've seen the other pins on Pinterest where people have this set up just on the ground, but that seemed extraordinarily dangerous to me as the kids are meant to slip and fall off the balls. So in order to protect them a little more (and homeowner's policy), I set this up in a pool of water where the kids would then have a cushioned fall.
The old tires are good for sitting the hopper balls in (handle side down) to keep them from moving all around. The ideal size tires would be motorcycle tires, but I was unable to locate any, so I just used 3 tires I had from a previous
Army party.

Once I added the water to the pool, I found that the tires sunk as expected, however the balls began to float all around since they weren't a perfect fit in the tires. To combat this, I folded a piece of duct tape in half width wise (so that it stuck together) and extended it across the length of the bottom of the tire. I then used a staple gun to staple the one end of the duct tape onto the bottom of the tire. Next I arranged the hopper ball in the tore, again with the handle side at the bottom, and slid the duct tape through the handle. Then I just staple gunned the other end of the tape to the other side of the tire.
Although rudimentary, this crazy solution worked perfectly to keep the balls in place and not floating around the pool.
Please make sure all staples are VERY securely in the tire so they don't slip out and cut a child's foot!
After filling our pool with water, I happen to come across a large stockpile of Squishy Baff in our linen closet that I hoarded when I found it at the Dollar Tree one day.

If you don't know what this stuff is, check it out! It's ridiculously gross and creepy, but SO much fun at the same time. Another Aha! moment!
What if, instead of water, we filled the pool with Squishy Baff?!?! Unfortunately
, this stuff needs warm water to activate and the Big Red Ball pool was all the way in the back of my backyard. But, I had already proposed the idea to my son, so there was no turning back. This meant filling lots and lots of 10 gallon tubs with warm water in my kitchen sink and then hauling them down to the pool. At least I got my workout!
All was worth it though for this AWESOME gooey pit though!! Most of the party guests had never seen the stuff before, so they were completely enamored and were more than happy to fall of the balls into this fun goop!
Ring-A-Ding - Another super easy set up! Just fill a large rectangular inflatable pool with water and use 3 inflatable inner tubes (I also purchased from Five Below). Have the kids try to slide through all 3 and out to the other side of the pool. Surprisingly to me, this proved to be more challenging than I expected for most kids, but they all enjoyed getting "stuck" inside!
Sucker Punch - This was a course favorite for sure! I wracked my brain as to how I could create sucker punch obstacle without building a giant wall until I finally came up with a ridiculously easy set up. I used a big plain white poster sheet, a poster marker, scissors, some string, a 2 x 4 piece of wood, a couple bricks, and (my favorite part) Socker Boppers.
To make the "wall" (the banner), I first inflated a Socker Bopper to be able to cut the correct size holes. I laid the banner on the floor and traces around the Socker Bopper where I wanted my howls to go. I then cut the holes out and then wrote on it with my banner marker. I strung the banner tought between 2 trees, flush with the ground. In front of it is where I set up the 2 x 4 piece of wood. I used the bricks to slightly elevate it in order to create more of a balance beam.
The kids laughed hysterically as they hid behind the sign, trying to punch their friends off of the wood with the Socker Boppers. To my surprise, no side shenanigans broke out with the Socker Boppers...I secretly patted myself on the back for creating an environment so fun that 8 year old boys didn't even feel the urge to punch one another when given the opportunity. Haha!
Face It - I also saw this obstacle on other Pinterest pins and adores it, but the set ups were so elaborate. As always, I wanted an easier way! I looked around my yard to see what I already had available to me that would allow me to suspend water filled balloons from. Duh! The deck!

I filled regular balloons with water about 1/3 of the way full...these got HEAVY! I measures the length from the floorboards of the deck to where I wanted the balloons to hang and then doubled that length for each piece of string. Folded in half, I threaded each end of the string down the sides of one plank so that it looked like this from on top of the deck:
Underneath the deck, I pulled each end down and tied the balloon onto the two ends together to the approximate height in which it would smack the kids in the head. Don't worry, despite the weight of the balloons, I personally tested smacking myself in the head and face (which was a treat) and it did not hurt at all. I strung the balloons in rows about 12" apart, leaving 1 deck plank between each balloon. I only ended up hanging about 7 balloons because, at this point of the party prep, it was about 5am and my body was getting exhausted. I'd recommend more of possible, but if you're exhausted at this point, 7 balloons was still a good amount for the kids to love getting bopped with over and over.
Drop Zone - If it's in the budget, an inflatable water slide rental is absolutely guaranteed to entertain all of your party guests for hours upon hours. Obviously prices will vary, but I rented ours for $300 for a guaranteed 4 hour time window just to give you an idea of cost. The company actually arrived 3 hours earlier than I reserved for and my 2 boys played on it the ENTIRE time leading up to the party and the ENTIRE time after the party until they literally drug it away from under their feet. I believe my younger son was still actually on it when they began dragging it away, lol! THAT'S how much fun it is!
Quick note for prepping for a slide rental: Be sure to ask for the exact inflated dimensions when you reserve so that you can plan out a spot in your yard where it will fit prior to setting up the other obstacles.
Cake - This was honestly the easiest and quickest cake I've ever decorated. For convenience I pre-ordered a cake a my local grocery store. I asked for it to be plain white, with no decorations or borders, and smooth edges. I picked it up the morning of the party and it was absolutely perfect...plain and simple as can be!
The night before the party, I made some red and blue fondant with
this super easy candy melt recipe It literally took me less than 15 minutes to make and roll it out! I then just cut out the letters and made a freestyle water splash with a butter knife. I stored all these pieces in a cool, dry cubbard until the morning.
After I picked up the cake the morning of the party, I just transferred all the pre-cut fondant pieces onto the plain cake, using a tiny bit of water on the back of each to make them stick. For the big red balls, I just added some of my extra gumballs from the favor treat bags to the tops of golf tees, attaching each with a glue dot, and inserted them right into the cake. (Note: I would typically recommend using icing as a glue, but I figured the glue dot would hold better and the golf tees aren't edible, so it was fine.)
Voila! A beautiful cake that took minutes to decorate and looks like you had it custom made for you!
Signs - Totally unnecessary but certainly added to the visual element of the party! I created these on my computer and then laminated them as I knew they'd be getting wet. I affixed then to stakes using a staple gun and then just hammered them into the ground at each obstacle.
Printable versions of the signs will be made available soon! I'll link that when available.
Popcorn - Another hit among the kids and a little different than the usual bowl of chips. I purchased some big bags of pre-made popcorn at the grocery store just to give myself one less thing to do. I filled each of these individual popcorn bags, folded closed, and stapled shut. Easy as can be!
Snow cones - These were such a refreshing treat for the kids on a hot summer day! They were super simple to make ahead of time too!
I used my Ninja blender to make "snow" the day before the party. I then filled each
paper cone with the snow, using my hand to mold the rounded top. They do harden after they've been re-frozen, so expect more of a hard, ice cream truck snow cone come party time vs the shaved ice snow version you first stuck in the freezer. I also found awesome recipes on Pinterest for making snow cone flavors using jello! So much cheaper than purchasing bottled flavor! I made 4 flavors ahead of time, let them cool, poured them in my squirt bottles and refrigerated. Come party time, everything was ready to go to surprise all the guests! They all loved being able to choose their own flavors and mix them all up!
More Pics From The Party:
...and my favorite picture of all, a very happy birthday boy!
Happy party planning and wishing you all an absolutely wonderful and memorable event!